Import from CSV file
If you have your client’s trial balance information in a CSV file, you can import their initial trial balance to save you having to enter it manually.
- Trial Balance > Enter an initial trial balance > Import Trial Balance or Trial Balance > Enter comparative trial balance > Import Trial Balance
- Click .CSV template to download an example CSV file. This will help you have the information in the right columns.
-
Open the downloaded file. This should open in a spreadsheet program like Microsoft Excel.
-
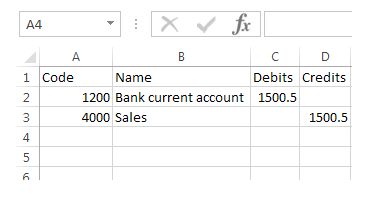
You could complete this file with your client’s figures, or rearrange an existing spreadsheet you have so that the columns are in the order: Code, Name, Debits, Credits.
You need to enter either a Code or Name.
When saving the CSV file after making your changes, you must save it in CSV format. Depending on what spreadsheet program you’ve used to open the CSV file, when saving you may be prompted to save it in a different format. Disregard this advice and save in CSV format.
-
Click Upload > find your client’s CSV file > Open > Clear the checkbox next to any rows you don’t want to import > make any adjustments to values > Next.
You’ll need to review these mappings and make any adjustments you feel are needed before confirming.
-
Review the list of mappings > Make any necessary changes > Save.
Changes you make to mappings are saved to be used by this client again in other periods.
To make changes to the mappings
Rows marked in orange with a Select a nominal account button need a nominal account selecting before you can save.
- On a row you want to change, either click Edit or Select a nominal account. The row expands to show you the current mapping and more options.
-
Click Select another nominal account > enter the code or name > enter the value
or Create nominal account to map > enter the nominal account details > Create.
Repeat this step allocating the imported value to how many accounts are necessary. This can be a mixture of existing nominal accounts and newly created accounts.
-
Confirm.
Repeat this until you’ve allocated all your account balances.
Mappings are saved